
IDEX 3D printer project
(1/2020 - 5/2020)
Some quick spec:
-
Build volume if using only one extruder:
-
300mmx300mmx300mm
-
-
Heated bed max temp:
-
140c
-
-
Dual independent extruder
-
Left: E3D Hemera
-
Right: generic Bowden tube extruder
-
-
Dual z motor
-
Dual y motor (currently only one is installed)
-
linear rail for all axis
-
control:
-
Duet 3D 6HC
-
raspberry pi 3 B+
-
-
cooling:
-
All Noctua fans
-


Printer highlight:
-
State of art extruder with direct extrusion enabling flawless printing of flexible material such as TPU.
-
Enabling it to print compliant mechanisms with a combination of rigid and flexible material. As far as I know, this is the only printer that could do this.
-
-
Robustness of the printer
-
Trinamic 5160 stepper driver which is capable of 4.45A RMS & 6.3A Peak current. (it will fry the motor before killing this microcontroller)
-
Custom ¼ inch laser-cut aluminum print bed base (super rigid I can even stand on it without it binding a bit)
-
All linear rail for ultimate stability.
-
-
Scratch build so continuous upgradability. (already had 3 revisions)
-
Custom fan shroud enabling better part cooling and I can mount a dial indicator for easy bed leveling.
-
Custom firmware for the printer’s control.
-
-
Ultimate silent printing achieved by all Noctua fans and all Trinamic motor drivers.
custom laser-cut 1/4 inch anodized aluminum base plate
Why I built this printer?
In short because I can and for fun. The long version: I have found some cheap materials (aluminum extrusions, linear rails) on Aliexpress and I’m dying to use them, and I have a need for a printer that is capable of printing a combination of flexible and rigid material for my mechanical arm project (see that project page for detail, site under construction).
The build:
Mark 1:
Because this was just a fun side project so I didn't want to spend too much money on it. I set a $1,000 budget for it. And because I thought this is just going to be an easy fun project I didn’t even bother to draw it in CAD (computer-aided design) before I bought all the materials; I basically designed the whole thing in my head. (at this point I’ve been working with 3D printer for around 4 years and knows the ins and outs of 3D printer, I was wrong)
Only after all the material arrived I’ve realized that all the joints are going to be 3D printed, thus I have to draw CAD for it. Me being me, I didn’t design the whole 3D printer in one go; instead, I designed and drew the parts I needed as I went. I did manage to build the whole printer this way, and it does prints; just not very good.
The bad print produced by Mark 1 is due to the printer’s overall lack of rigidity. Because of my lazy design method and me cheaped out on not buying enough materials.
Mark 2:
I “redesigned” the printer in CAD; I reused most of the parts I’ve designed in Mark 1 and have added way more aluminum extrusions than I needed for additional support, so the frame of this printer will be super rigid. I've also added a new laser cut aluminum print bad base to replace my old wooden one. In the end, the Mark 2 printed much better, but still not good enough for my standard. At this point, the structure of the problem should not be a problem so it must be the drivers (x, y, and z motor).
Mark 3:
I redesigned all the motor mount, and cleaned up the printer design in CAD; printed everything and now the printer produce perfect print every single time. However, there will be more good-to-have upgrades to the printer.
Conclusion and lesson learned:
Overall a fun project. Reflecting back I shouldn't have skipped those steps. If I was not lazy and drew the whole printer from the start, I wouldn't have spent that much time fixing it; I definitely spent more time fixing the printer than the time I spent designing it. By the way, all the joints or custom parts on this 3d printer right now were being printed by this printer, except for the parts. used in Mark 1 (the printer was literally printing itself!)
some prints
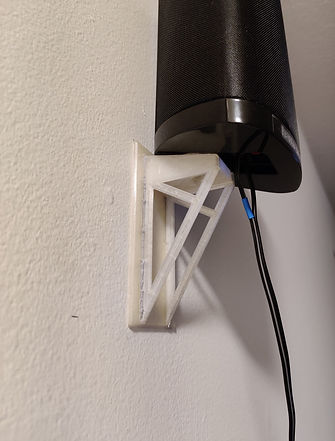
a wall-mounted speaker stand for a friend
dual material printing at work
compliant mechanisms test print
the 3D printer cooling fan duct test,
transparent: new, gray: old
both printed with this printer
the new one has added internal guide fins
